First off, it is definitely not plug and play and it might be
Mac-ready but it's definitely not PC-ready ;-)
So first of all it comes with no instructions whatsoever, the only hint it gives you is a link to support.wdc.com -> knowledge base ID# 1550, clicking here lets you download the drivers, formatting utility (which i discovered was useless), and backup software.
The driver installed without a problem, the formatting utility did not which might be because i am out of disk space on my primary drive. Clicking on the knowledge base for clues let me to "a consult the quick start guide" which came with the disk. The only quick start that came with it was the link to tell me to go to support.wdc.com.
The FAQs knowledge base was really poorly structured and the answers contained hyperlinks to other answers which contained further links.
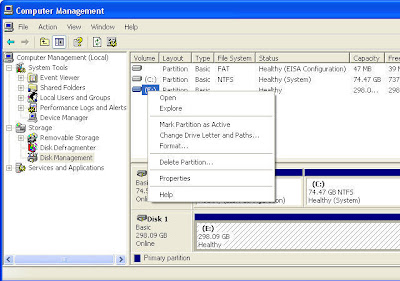
Clicking around I eventually found this which tells me to go to use the Windows Disk Management Utility.
So here are the instructions for this:

(in the screenshot it is already assigned to a volume but when I first started this was blank).
Right click on My computer, Click on Manage, then Click on Disk Management. In the top frame you will see an unlabelled disk which is the your new WD hard drive. Right click this and select format, assign it a volume (letter) and then wait for a minute whilst Windows formats your drive. Formatting takes quite awhile for a 350GB drive especially on my crappy dell. Once formatting is complete the drive will be assigned an online status of healthy and you can click on My Computer and you can now see and use your external hard drive!

1 comment:
thank u, important info at the right time
take care
balaji
Post a Comment